

Hi Guys,
I had a few people emailing me asking how to create a thumbnail screenshot image, so I thought I'd do a blog post about how to do it using paint.net. I chose paint.net as it is free :)
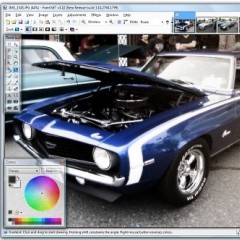
Below you can see I've loaded up Paint.net and this is my starting canvas (notice the similarities to Adobe Photoshop):

Now, the first step in creating your thumbnail screenshot is to take a page that you want o make a thumbnail out of and load it up in your web browser. I chose the affilorama blog. Then press the "print screen" key on your keyboard. Then click into your paint.net windown and press ctrl-v (paste). Allow it to resize the canvas if it asks you for permission.
You should now see a page like below:

Next you'll want to crop out any unnecessary stuff that is in your image. What you do is click on the dotted square box on the top left of the toolbox in Paint.net. Then select the area that you want to keep (ie the shaded area as shown below):

Then go to the Images menu at the top and choose "Crop to Selection"

Then go back to the images tab and select "Resize"

Now change the height to the height that you want your thumbnail to be. I've chosen 200 as you can see below (btw, make sure that 'maintain aspect ratio' is ticked):

Now you're done, you can save your image as a jpg, gif or whatever you wish.
And as a result, we have our final thumbnail screenshot below (created in paint.net):

Bear in mind there is a whole lot more you can do using this handy, free image editing tool, such as drawing, applying effects and more. It isn't as good as adobe photoshop, but hey, it's F-R-E-E, and it does the trick :)
Mark


• 18 years ago
norm.
Mike • 18 years ago
Albert Grande • 18 years ago
Thanks.
Anish • 18 years ago
Thanx for sharing this wonderful application for image resizing.
Thanx
Anish
Replica Watch • 18 years ago
This one look like a nice tool.
would help me resizing the image for my website.
Can you please tell me from which site i can download this application
Thanx
Sanjay
John • 18 years ago
David Busey • 18 years ago
Also, there's a great little shareware program called "Graphic Converter" that is another great Photoshop alternative. It's pretty powerful actually. It's not free but well worth the $40 or whatever I paid a few years back. Especially when compared to the hundreds you'd plunk down for Photoshop.
Enjoy!
Mimenta • 18 years ago
Bob McGuire • 18 years ago
so I used Pete Drew's Bad Ass RSS software
and sent the RSS feed to 20 aggrigators.
Since you had my links showing, I should get
link credit by sometime tomorrow. COOL!
In that case here is a couple more links.
http://www.expertcarpenter.com
http://www.expertwaterproofing.com
thanks.
I hope you have the nofollow removed!
Bob